How to Prep Your Tagging Surface for RFID Tags
Items or assets with certain surface materials can be difficult to tag with RFID adhesive labels or RFID hard tags with permanent or semi-permanent attachment methods. We recommend following these simple steps in order to ensure that your RFID tag properly adheres to your material.
Prepping Your Tagging Surface
Step 1: Determine Attachment Method
Determine the asset’s surface material and the tag type in order to decide the best attachment method for your tag, surface, and application. Each RFID tag usually has a few recommended attachment methods that are common, but that doesn’t necessarily mean that they have to be used. For instance, when using RFID inlays, the most common attachment method used is general or extra-strength adhesive. However, some item materials and applications do not work well with adhesive so they must be attached differently. Here’s an example:
-
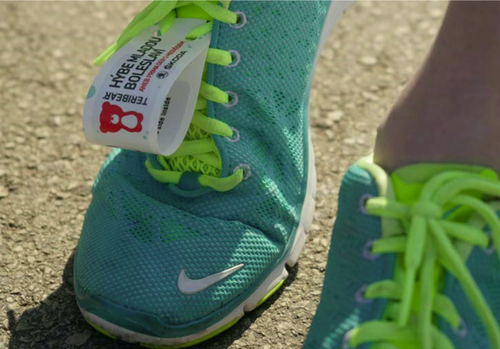
Typically, RFID inlays are adhered via general adhesive or extra-strength adhesive. However, in some RFID Race Timing applications, RFID inlays are laminated and a hole is punched in the laminated tag in order to thread the tags through a runner’s shoe lace. RFID inlays could not adhere to an individual’s shoes because of the spongy, soft material and the amount of movement the tags would have to endure.
Step 2: Tag Placement
Choose the exact location on the item/asset that you will be tagging. Placement is key when tagging items with RFID tags because a poorly placed tag could result in substandard read rates, which could lead to an unsuccessful deployment. Here are some key points to consider when choosing the best tag placement:.
-
Place the RFID tag in a position where it will be the easiest for the reader to read. For an example of this, take a look at this quick video that discusses tag placement on Files and demonstrates the best tag position in correlation to the shelving and the RFID handheld reader.
-
Do not place a tag in a position where it will be directly behind another tag. This results in less than ideal read rates because of a concept called Tag Shadowing.
-
If you are tagging liquid-filled items, remember to place the tag in a position to be closest to the air in the container, not the liquid. The human body can also be considered a liquid-filled item when talking about RFID because an adult human body is about 60% water. To mitigate this potential issue, RFID Race Timing applications that RFID tag the runner’s bib use an RFID tag with a foam-backing (see below) so that the RFID tag is not flush against the human body.
Step 3: Prep the Surface
Clean the surface with alcohol wipes or a damp cloth and wipe away all dust and debris. Ensure that the tagging surface is free of any particles before moving forward and allow the area to dry from any alcohol or water used in cleaning. The space should be clean and completely dry before continuing to the next steps.
Tip to Avoid: Do not Smooth the Surface
Do not buff or smooth down the surface - here’s why. When you buff down a surface until it is smooth, the adhesive has a harder time gripping to the surface of the item. With a rough surface, the adhesive has more surface area to grip to, allowing for a stronger bond between the tag and tagged item.
Step 4: Place Tag
Carefully place the tag in the desired location and press down. Do not press down with too much pressure, especially when attaching a thin RFID label or inlay. If too much force or pressure is exerted, it could possibly break the potentially fragile connection between an inlay’s antenna and IC.
Additional Steps Will Depend on Your Attachment Method
Besides general adhesive or epoxy, there are a few other ways to attach an RFID tag. Take a look at the most common attachment methods below, as well as some common facts/information about each.
Adhesives: General Adhesive/Extra Strength Adhesive & Epoxy
Ensure that the area is clean and dust and dirt free and then attach your tags.
Drilling Methods: Screws, Rivets, and Embedding
Methods that require actually drilling into the assets can be a little more complex. Check out this infographic about Embedding RFID Tags.
Hanging Methods: Cable Ties, Strings, Holes
When attaching an RFID tag via hanging, fully vet the part of the item that the tag will attach to, before moving forward. Ensure that the tag will not be hanging from a location that is handled frequently, prone to damage, or is fragile enough to break off.
After deciding the best place to hang the RFID tag, ensure that the tag cannot fall off or become unattached at any time unless taken off on purpose.
Sewing Methods
Generally, attaching RFID tags via sewing into linens and garments doesn’t require much preparation, except for deciding the optimal tag placement. After tag placement is decided, the tag can either be inserted into or sewn into the hem of a garment or sewn behind a label, if size permits. If inserting the tag into the hem, and the garment/linen has a pre-existing hem, simply cut a small portion of the threading or linen to open the hem, insert the RFID tag, and sew the opening back closed.
One important consideration is that you do not want the tag sliding along the entire hem at random, because it will be harder to find the tag and receive a tag read. The best way to ensure your RFID tag stays in the same place is to sew a barrier between the hem containing the RFID tag and the rest of the garment’s hem - creating a small pocket for the RFID tag. This pocket will keep the RFID tag in place so that it is always in the same spot for an easier read. See the graphic below.
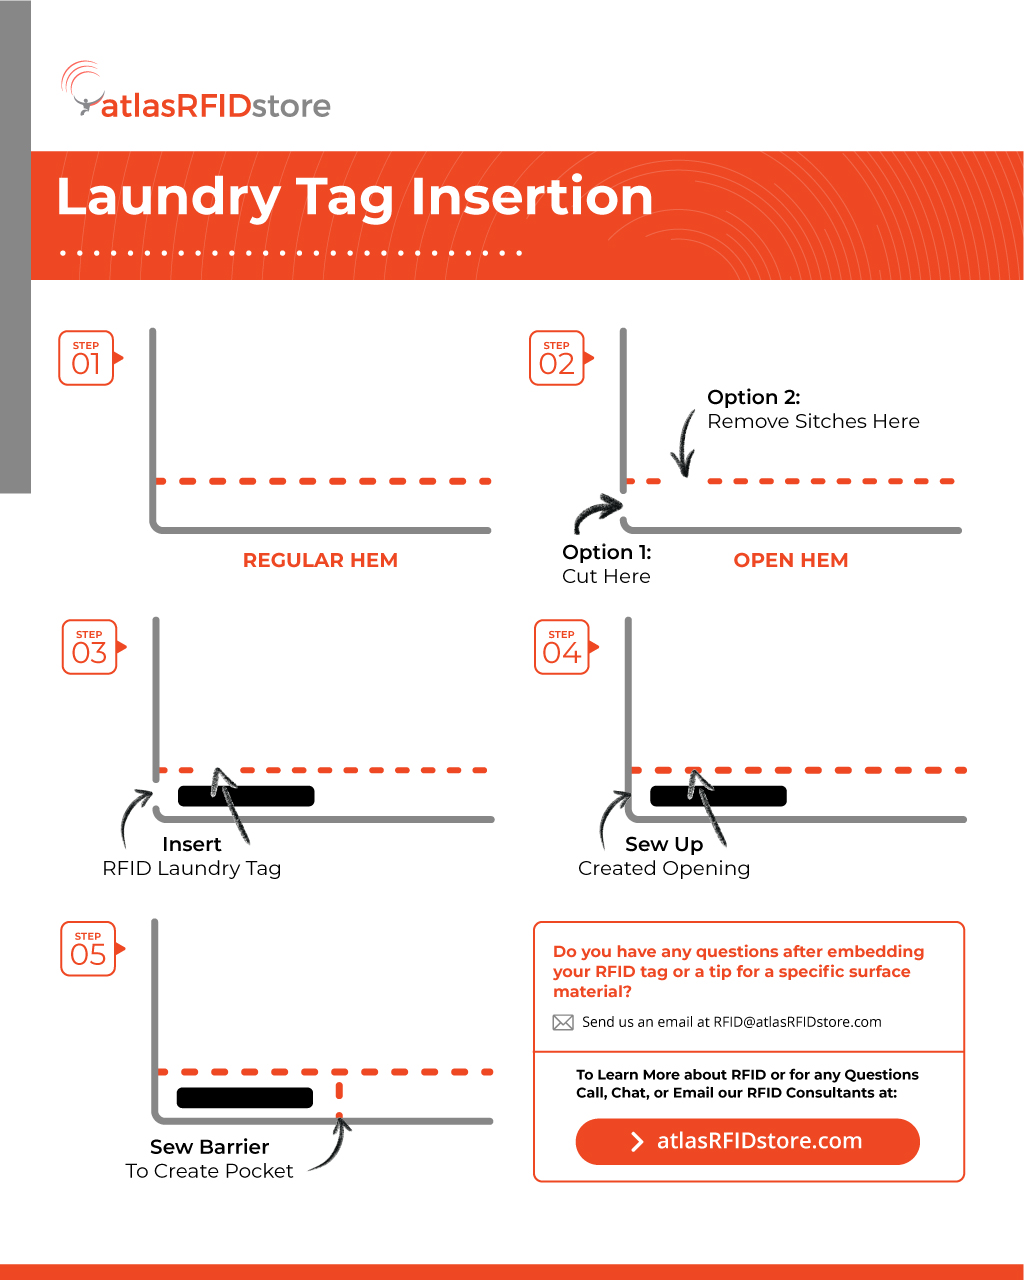
Click the image to see the full-size version
Conclusion
We hope you enjoyed this article about how to prep your tagging surface For more information on all things RFID, comment below or contact us.
For more information about RFID tags and tagging - checkout the articles below.